
Archive: Author: Prepsteaders
GETTING STARTED WITH FREEZE DRYING
RECOMMENDATIONS for the HARVEST RIGHT FREEZE-DRYING SYSTEM
https://harvestright.prepsteaders.com (This is an affiliate link. If you buy through it, Harvest Right will guarantee their lowest price available to you, and they will send a small but helpful commission to keep PREPSTEADERS going.)
THIS IS WHAT YOU WANT FROM HARVEST RIGHT:
- Medium or Large Sized Freeze Dryer (The Small size will not give you the best return on investment.)
- Premier Oil Pump (This is far superior to the standard oil pump and requires far less maintenance. The Oil-Free pump sounds great but may not have all the weaknesses worked out yet.)
- Extra Set of Trays (Definitely get 2 sets! You will find that almost every food does best if it is frozen first, so having an extra set in the freezer while you have a batch Freeze Drying keeps the cycle streamlined.)
- Food Sealer system (It comes with an Impulse Sealer for sealing Mylar Bags. (I personally prefer glass jars to mylar bag storage.) Still, this will allow for personal “MRE” style meals, for backpacking, etc.)
- Mylar Bags (It comes with a set to get you started! The best to get additionally, I have found to be the Heavy 7 Mil thickness, 2 Quart sized, with the gusseted bottoms so they stand up for me as I fill them. https://amzn.to/3mE6whN
- O2 Absorbers (no more than 10 Wrapped 500cc) https://amzn.to/3kx862z
Here are what I have found to be the best setup for the whole system to work:
- 24×48 Stainless Steel 330 pound capacity prep table on lockable casters (Your Freeze Dryer is HEAVY. It will come delivered on a palate by forklift. You need a clean, super sturdy surface for it.) https://amzn.to/3E8kIr1
- Desiccant Silica Gel Moisture Absorber Packets https://amzn.to/3sWeoN1
- Digital Food Scale https://amzn.to/3kwcUVU
- Parchment Paper (These natural, pre-cut sheets are perfect when cut down the middle!) https://amzn.to/38paKBL
- Extra Small Cookie-Dough Scoop (This ½ Tablespoon size works best.) https://amzn.to/3gHJjYf
- Pastry Cutter/Scraper (I use this to scrape the contents off the trays with ease!) https://amzn.to/2WzyVdR
- Stainless Steel Canning Funnel (These make filling the bags a breeze!) https://amzn.to/2WqM61l
- 7×9 Stainless Steel Trays (These aren’t mandatory to get started, but really come in handy for small batches you want to keep separate …like yogurt and sour cream and liquids, etc.) https://amzn.to/2WtRvUQ
- Tray Stackers (Currently, these only on Etsy. I told Harvest Right they need to carry them! Totally handy when pre-freezing anything!) https://www.etsy.com/listing/943315060/tray-stackers-for-harvest-right-freeze?ref=hp_rv-2
- Freezer with extra Room (Some people like the case style freezer, I feel an extra upright freezer would be best!)
- Small Fan to blow on Oil Pump (These are optional, and unnecessary if you keep your system in a 70-80 degree room.)
This list is shared to help you get set up for successful freeze-drying from day 1. These are what I personally use but are not requirements for you to be successful. As an Amazon Associate we earn from qualifying purchases. Some of these are affiliate links. Thank you for supporting our channel!
How To Make Foraged Wild Clover Pudding
White Clover Pudding – My Favorite Taste of Spring!
3 cups freshly picked Clover heads
1/4 Oz. Unflavored Gelatin (or 1 Envelope)
2 Cups Fresh Squeezed Orange Juice
4 Tablespoons Raw Wild Clover Honey
2 Cups Whipped Heavy Whipping Cream
Optional: A Couple Spriglets of fresh picked Lemon Mint or Verbena
Remove stems and any browned areas from Clover. Rinse.
Place the Clover, Gelatin, Orange Juice in saucepan and stir over medium heat just enough to dissolve the Gelatin and fully incorporate everything. Add Honey and stir well. Let rest for 15 minutes, then refrigerate until beginning to set (30-60 minutes). Remove from refrigerator and fold together with Whipped Cream. Garnish with Sprigs of Lemon Verbena, Lemon Balm, Mint or more Clover!
Devour with your most enthusiastic friends. 🙂
Tips:
– Don’t use an aluminum pan, only steel or glass.
– Experiment and try this with Wild Honeysuckle or Wood Sorrel for an interesting variation!
– Use quality Gelatin. If it is cheep, sometimes people notice a fishy or beefy taste which is not particularly pleasant.
– Write to PREPSTEADERS with your own creative Clover recipes!
~~~LINKS TO MORE AMAZING RECIPES WITH WILD CLOVER!~~~
ALASKAN “HONEY”
HOMESTEADER “HONEY”
RED CLOVER JELLY
CLOVER COOKIES
CLOVER TEA
“CLOVER SNOW” (Clover Pudding made with Agar Agar)
CLOVER BREAD
Our Amazon Store & Recommendations
Your First Time Using a Dutch Oven? Start Here!
Here is a Chart showing the general vicinity of temperatures to expect from your briquettes.

If you are saving your money to only get 1 Dutch Oven, I recommend a 12 Inch Size so you can bake a good sized round loaf of Sourdough Bread or a pie or a small pizza or such. Any smaller and they wont fit as easily, but then, I’ll bet you will figure out a way to cook just fine anyway!

I hope these charts are helpful. One of the coolest (hottest) things about Dutch Ovens is that as you are able to buy a second and third one, you will find they can be stacked for cooking multiple stews and breads and desserts all at the same time! It is amazingly efficient…but we will get more into that in later episodes.

Here are some of the Dutch Oven Basics to Budget for: (I have no affiliation with LODGE at the moment, but like that they are Made in the USA and have a good return policy.)
[WooZoneProducts asin=”B0008G2W0M”][/WooZoneProducts]
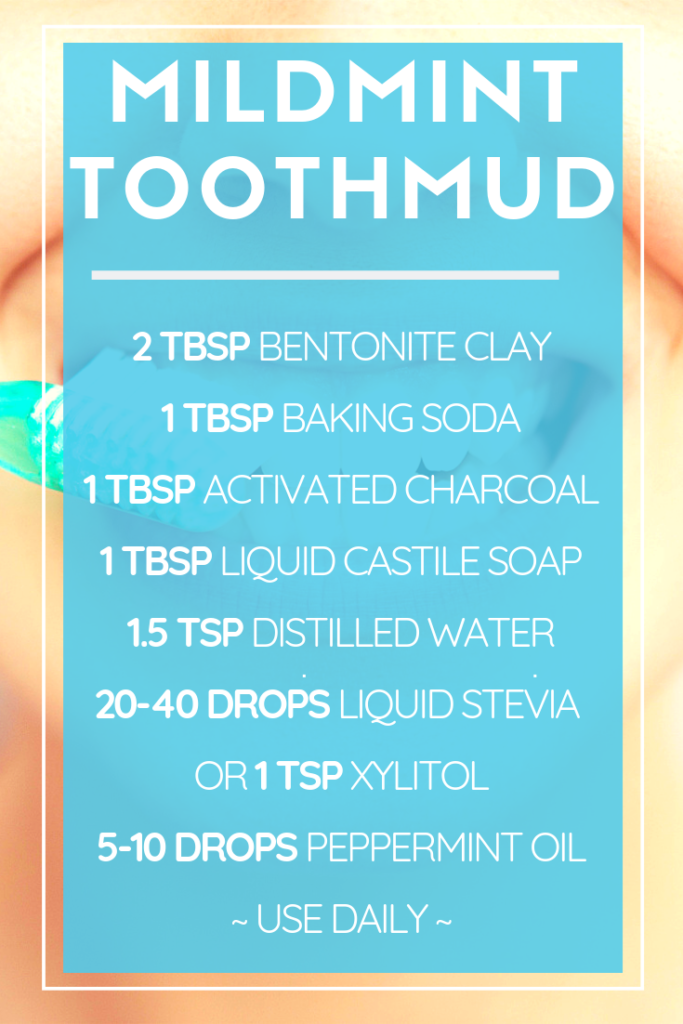
DIY HOMEMADE MINT TOOTHMUD
Here are the RECIPES, with LINKS BELOW!

How to Find FREE LOCAL Training for PREPSTEADERS
So, Here is the list of places to look locally for training!
- Language Classes
Technology Training
Ham Radio
Health and Wellness
Gardening and Seed Exchanges
Literacy and Homework Help
LOCAL CHURCHES
- Southern Baptists: ROYAL AMBASSADORS
- Assemblies of God: ROYAL RANGERS
- Seventh Day Adventist: PATHFINDERS
- The Calvinist: CADET CORPS
BOY SCOUTS of AMERICA
FUTURE FARMERS of AMERICA
4-H Clubs
- Foraging
- Self Defense
- Language Classes
- Small Engine Repair
- MEDIC Training
- Ham Radio/ Short Wave Radio Operation
- Hiking Groups
- Camping
- Foraging
- Bush-crafting
- Survival and Emergency Preparedness
- Provident Living Groups
- Baking
- First-Aid/AED/CPR
- Shelter Operations
- First Responder Training
- Disaster Drills
Garden Clubs
- Cooking Classes
- Canning
- Fermenting
- Baking
- Cooking with Wild Herbs and Foraged Vegetables
- Gardening and Seed Exchanges
ROTC (Reserve Officer’s Training Corp)
Gun Shops
Sewing Shops
Agricultural Event Centers
CERT (Community Emergency Response Training)
- Cooking Classes
- Firearm Carry Permits
- Gun Safety Certification
- Wilderness Adventures
- Foraging Classes
- Self-Defense Classes
How to Make Your Own Natural Waterproofing Leather Balm
1:1:3 RATIO
That is the simple way to measure your choice of ingredients for this. My favorites are:
1 Part Beeswax
1 Part Cocoa or Shea Butter
3 Parts Castor Oil
Delicious No-Knead Multi-Grain Bread
- 3/4 cup dark brown sugar
- 1 tablespoon of your best salt
- 1 3/4 cups old-fashioned oats (Not Quick Oats)
- 3 cups boiling water
- 2 tablespoons of butter
- 2 1/2 teaspoons Active Dry Yeast ( or 1 pkg )
- 1/4 cup lukewarm water
- 3 cups all-purpose flour
- 2 cups whole wheat flour (I suggest Einkorn if you want non-GMO)
- 1 cup *Wildcard!* – your choice of additional grains or whole wheat flour (My favorites are Poppy Seeds, Chia, Flax Seed, Sunflower Seeds)
INSTRUCTIONS
- Stir brown sugar, salt and oats in a large mixing bowl. Add boiling water. Add butter. Cover and let stand at least 30 minutes or as long as overnight. Do not go further until it has cooled to room temperature.
- In a small bowl, sprinkle yeast over the 1/4 cup lukewarm water. Let this stand for about 5 minutes. It should become bubbly to indicate it is good active yeast. Add to the oat mixture and stir.
- Add the flour a cup or two at a time. Stir with the long handle of a wooden spoon in a smooth motion from the outside edge to the middle, repeating until incorporated. If I get really creative with the extra grains I want to add, I stir them in with the other flour before adding into the oat mixture.
- Transfer dough into a buttered bowl and cover with a damp tea towel or buttered plastic wrap. Let rise in a warm spot until about doubled in size (about 2 hours).
- Butter the inside of two loaf-sized bread pans. When dough has doubled, gently divide it into two equal portions. Place each portion into your prepared loaf pans. Cover again and let rise until dough has climbed at least above the rim of the loaf pans.
- Preheat the oven to 425ºF. Bake loave for 10 min. Reduce heat to 350ºF. Bake for another 40 to 45 more minutes or until the bottom of the loaf sounds hollow when tapped; (you will need to remove the loaf from the pan to test this). Turn loaves on their sides to cool. . .if you want to do it like my grandma did. (A wire cooling wrack will work fine too. )


